Search
The Renewable Energy site for Do-It-Yourselfers
Tom Changes Wind
Turbines
This is a note from Tom Sullivan
explaining a major change to his wind turbine installation:
After 18 months of low
production numbers on my Breezy, combined with noise
issues my wife and neighbors were more than a little tolerant about, I decided
to take the Breezy down and try another option. I befriended a retired EE / PE,
Larry, who was playing with a homebuilt permanent magnet machine in a parking
lot, on the 4th of July this year. I couldn't resist stopping to see what he was
working with. When I disclosed to him about my Breezy and 140' tower, he all but
insisted on seeing it that same day (and he did). Larry took the Breezy builders
book home and studied it, looked at the website, and reviewed my low production
problems. His assessment was we (our area of the country) don't have enough wind
to support the narrow band of generation that is inherent to an "induction motor
based" wind turbine (at least of this design). He offered me the use of a
1935-1950's era 1800 watt Jacobs he had obtained, He had recently gone through
the generator motor and had tested it with a set of plastic blades, without a
tail and in a down wind mode, as the plastic blade rotation was backwards from
the original Jacobs design. He was interested in seeing it operate in a good
location (up high on a tower), and would help me with the slip ring fabrication
and controls. I would need to build (or buy) new blades, fabricate the bearing
assembly and tail structure, and build or find a tail vane.

I needed to keep the investment low, as my wife was no longer tolerant of
serious investment in wind energy, given the poor production results of the last
venture. I laminated and carved my own blades, using the damaged originals as a
template. We fabricated the tail structure out of the same size angle iron used
by the factory in 1935. The original tail was steel, but finding one in
serviceable condition, close to me, was not an option. I obtained the weight of
the original tail from another builder (those guys on
Field Lines
are awesome) and was able to use 1/2" "sign board" plywood, matching the
original tail vane weight pretty close. I sealed the end grain with spot putty,
and installed numerous coats of high quality automotive epoxy paint on it. About
this time I discovered this was becoming more of a labor of love; a restoration
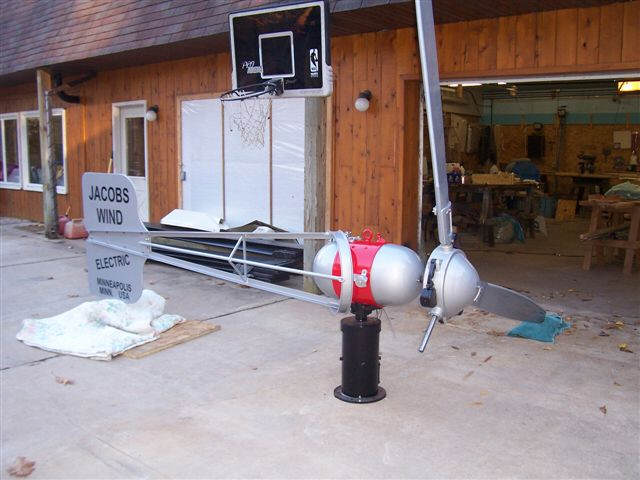
more than a project. I decided to body work and paint the two dome covers for
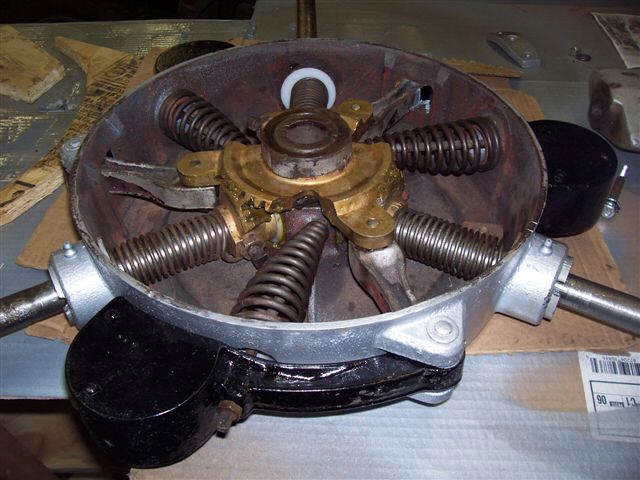
the motor, and the spinner for the prop. I then sand blasted all the hardware
and the variable pitch hub, and painted that with the same high quality
automotive paint. While checking the hub over, I discovered the bearings were
shot on one of the shafts. This is a pretty complicated pitch mechanism, and
production would be affected by one blade not tracking true, so I completely
rebuilt the hub. I painted the "fly weights" black so I could see when they were
working, extending out from the hub, as the governor control in high winds. I
assembled the unit on the ground in front of my garage, testing the fit of
everything.

Since I was now going to be making DC power, and at a much higher amperage than
the previous unit (possibly as high as 60 amps), I needed larger wire. Again,
trying to avoid a major expense, I scrounged around until I found enough used
wire meeting the amperage rating this turbine would generate. Most of it came
from a friend with a gravel pit; wire he saves and uses for powering the various
pieces of equipment in the pit. I ended up with 2 gauge aluminum for most of the
wiring run, and a disconnect for the base of the tower that would accept that
size wire was pretty expensive. I found an old "knife switch" disconnect laying
out in the weather at the pit, with a mouse nest in it. I cleaned it up,
sandblasted it, and painted it gray (it looked like new when I was done). We
briefly thought about grid tie on this unit, but decided to keep it simple and
hook directly from the controller to heating elements in my solar storage tank.
Since recently connecting my hot tub to my solar tank, via a stainless steel
heat exchanger, I can use almost every bit of extra heat that tank will
accumulate. (
http://www.aluminum-solar-absorbers.com/solar-hot-tub.html )
We went live about a month ago, and the unit is quiet, runs almost always, and
is on pace to generate 3-4 times the annual production of the Breezy. There is
something to be said about matching the wind turbine to your wind resource. This
unit will generate 200 watts all day long in light winds, and it will crank out
1,000 watts in a decent wind; all this while you can't hear it run. I've
discovered I set the blade angles improperly (the factory provided a gauge,
which I don't have). I will be dropping it down shortly for an inspection and to
reset the blade angles. I expect to see production climb a bit more after that.
Regardless, I can't say enough how happy I am with this old "restored" jenny.
For more info and pictures;
http://www.aluminum-solar-absorbers.com/wind-power-projects.html
As far as the Breezy, here's my thoughts. If you are in a good wind zone, high
"3"s, preferably 4-5, you will probably be satisfied with the unit. I understand
they now have a "soft start" option that will substantially reduce the
"clanging" I was getting every time the unit would lock in (which in marginal
winds can be several times a minute). The other noise was blade noise. If the
blades are made "per instructions" they leave a rounded off edge about 1/4"
thick. After communicating with a large pool of builders from
Field Lines
during my project, it's evident
this is a no-no. A thin trailing edge reduces noise, and another Breezy builder
about 60 miles east of me has removed and modified his blades to this thin
trailing edge. He noted his blade noise went down significantly. That leaves the
production issue, which I just don't think is realistic in lower wind zones.
This turbine will be a worthwhile project for someone with good wind. If you are
like me, with marginal winds, stick to a unit with a lower "start-up generation"
threshold. You'll be much happier with your investment.
Tom
Gary November 21, 2010


