
Search
The Renewable Energy site for Do-It-Yourselfers
Structural Design of Tank
I've laid out the structural logic
that I used to design my tank below. I'm not a tank designer by any
stretch of the imagination, so I don't guarantee that this is the best approach,
or even that it will
hold together. If you have suggestions for improvements, please send
them in -- Gary.
Since I would guess that some will
want to make the tank 4 ft high to take better advantage of full plywood sheets,
I've done the numbers below with a 4 ft high tank, even though my tank is only 3
ft high. This would give a tank that 88 inches wide by 40 inches
deep by 48 inches tall, or 731 gallons if filled full.
Some stats:
Size 88 inches wide, 40 inches
deep, 48 inches high
Volume of water 731 gallons (with 4
ft high tank)
Areas:
bottom and top = (88 inches)(40
inches)/(144 sqin/sqft) = 24.4 sqft
ends = (40 inches)(48 inches)/(144
sqin/sqft) = 13.3 sqft
long sides = (88 inches)(48
inches)/(144 sqin/sqft) = 29.3 sqft
Weight of water = (731
gal)(8.3lb/gal) = 6070 lbs
Pressure on bottom = (4 ft)(62
lb/ft^3) = 248 lbs/sqft
Outward pressure on long side = (29.3
sqft)(248 lb/sqft)(0.5) = 3630 lbs
Outward pressure on ends = (13.3
sqft)(248 lbs/sqft)(0.5) = 1650 lbs
So, the outward pressure on the tank
sides is large -- think in terms of turning the tank on its side, and parking a
medium size car on it.
Without going into a whole lot of
detail, here are the things that I think are important in making the tank hold
together under these fairly heavy loads.
The Base:
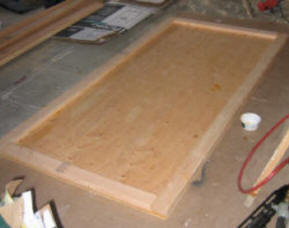
There should be a perimeter frame of
2X4's around the base sheet that are very well connected to the base sheet
(glued and screwed). These perimeter 2X4's transfer the outward pressure
from the sides and ends into the base sheet. This outward water
pressure load on the perimeter 2X4's is in the order of 2000 lbs -- resisting
this requires a good attachment of the 2X4's to the base.
The base sheet should be decent
quality exterior grade plywood, so that it can bear the 6000 lbs of water
weight, and transfer the outward force on the side walls across the bottom
sheet.
The tank base sheet must sit on a
solid, flat and level support. Something like a concrete slab, gravel pad,
or well compacted soil. The base must be uniformly supported over its full
area by whatever is under it.
Typically you will want to use rigid
foam board insulation under the tank. You don't have to worry about
crushing this insulation -- the common rigid foam boards are up to these
pressure levels.
The Top Perimeter Frame:
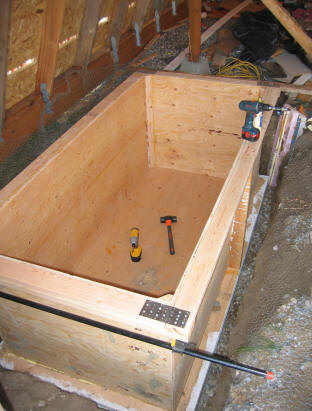
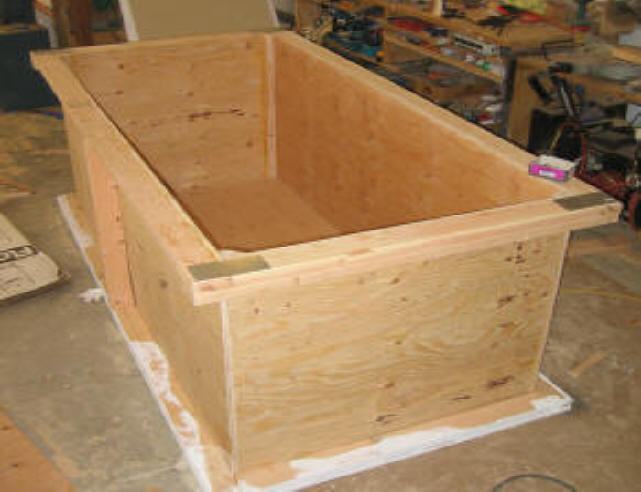
There is a frame of 2X4's around the
top edge of the tank that supports the upper edge of the sides and ends -- this
serves somewhat the same role as the perimeter frame 2X4's on the base.
These 2X4 upper edge frame members pick up the outward water pressure load on
the side and end panels. Most of this load ends up going into the
joints at the corners where the side and end upper edge frames meet. This
joint MUST be strong. It should be glued and screwed carefully -- it
should be a lap joint to provide the necessary glue shear area On my tank,
I took the extra precaution of adding a 2nd 2X4 across the ends that is joined
to the side frame 2X4's with metal plates -- I think this is a good idea.
The long side upper frame 2X4 is
heavily loaded (of the order of 1000 lb from water pressure) and is also long.
This makes for a bending load that is too high for this 2X4 to take. So,
one or more tension ties must be added across the top of the tank,
so that this upper frame 2X4 does not have to span the full width of the side
panel. Without this tension tie, the bending stress in the upper 2X4 is
around 3500 psi, which is well over the normal working strength of wood -- i.e.
without the tension tie the upper frame 2X4 will very likely break. I used
only one tension tie at the mid point, but 2 tension ties at the 1/3 points
would probably be better. These tension ties are most easily installed
after the EPDM liner is installed.
The upper frame 2X4's should also be
screwed and glued to the plywood sides -- this allows them to act as a single
unit to resist the outward bending forces.
The tension ties must be well secured
to the upper 2X4 edge frame -- the tension tie will be under several hundred
pounds of tension.
Sides and Ends:
The sides and ends should be decent
quality exterior plywood to resist the outward water pressure force (3600 lbs
for the two long sides). They should be well secured to the base perimeter
frame and to the upper perimeter frame, as described above. The vertical
edges of the adjacent side and end panels should be securely attached to each
other. I used a 2X3 ish vertical member in each corner on the inside that
is carefully screwed and glued to the side and end panel that it joins.
These corner pieces basically support the vertical edges of the side and end
panels, and take quite a bit of load.
I also put a vertical 2X4 at the
center point of the long sides that is glued and screwed to the side panel, and
attached to the top and bottom perimeter frames with metal angle clips -- it
seemed like a wise idea to break this large side panel into two panels.
This 2X4 is just visible in the two pictures above.
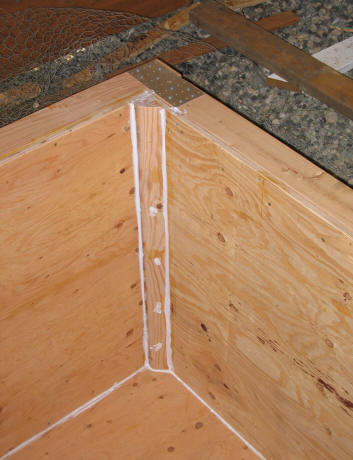
Picture showing the corner piece.
The Silicone caulk is just to make a
slightly less sharp corner for the EPDM liner to rest on.
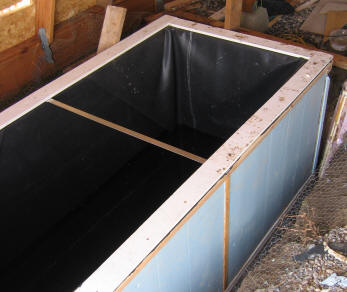
Picture with liner and top edge
boards installed.
The metal tension tie is visible
going across the top at the midpoint of the sides. The lag screws that
attach it to the top perimeter frame 2X4's are covered by the lining edge
boards.
The tension ties is approximately 1.5
inches wide by 1/8 inch thick galvanized steel. It is attached on each end
with 2 5/16ths lag bolts.
Its easier to put the tension tie in
after the liner is installed, but don't forget to do it!
Using the method above, my tank seems
to be doing fine, and I heard no creaks or groans as it was filling -- but,
again, no guarantees.
Another thing to bear in mind is that
with the cover off or loose, the tank could be a drowning and/or scalding hazard for kids
or pets. I plan to bolt mine down to eliminate this hazard.
Gary 10/23/2006
